 FINALLY!!! It's the "slow boat" and they're taking the long route around the north side of the Island, but we have ferries again. It's been just about the only topic of conversation for the past couple weeks, and people had been getting very antsy, but life just got so much easier!
 Wednesday, March 30, 2011
First Ferry!!!!
FINALLY!!! It's the "slow boat" and they're taking the long route around the north side of the Island, but we have ferries again. It's been just about the only topic of conversation for the past couple weeks, and people had been getting very antsy, but life just got so much easier! 


Mackinac Spring
"Mackinac Spring" is my entry in the Art Bead Scene monthly challenge. March's challenge piece is by Paul Gaugin, entitled Nave Nave Moe (Sacred Spring, Sweet Dreams).  Eugène Henri Paul Gauguin, 7 June 1848 – 8 May 1903, was a leading French Post- Impressionist artist. He was an important figure in the Symbolist movement as a painter, sculptor, printmaker, ceramist, and writer. His bold experimentation with colouring led directly to the Synthetist style of modern art while his expression of the inherent meaning of the subjects in his paintings, under the influence of the cloisonnist style, paved the way to Primitivism and the return to the pastoral. He was also an influential proponent of wood engraving and woodcuts as art forms.


Eugène Henri Paul Gauguin, 7 June 1848 – 8 May 1903, was a leading French Post- Impressionist artist. He was an important figure in the Symbolist movement as a painter, sculptor, printmaker, ceramist, and writer. His bold experimentation with colouring led directly to the Synthetist style of modern art while his expression of the inherent meaning of the subjects in his paintings, under the influence of the cloisonnist style, paved the way to Primitivism and the return to the pastoral. He was also an influential proponent of wood engraving and woodcuts as art forms. I choose three colors from the painting, red, yellow ochre and pewter grey to use in my piece. I decided to reinterpret the idea of "spring" and island" to fit Mackinac In northern Michigan, spring is slow and subtle and on Mackinac, one of the first signs of spring is the gradual exposure of the limestone rock which forms the island.
Our first plants to appear often do so from the protective cover of the previous seasons growth. This is the inspiration for the color palette of this necklace: a base of a neutral pewter grey, with touches of subtle, yet rich wine red and ochre yellow. This base is highlighted with two lampworked floral beads, peeking from a freeform backing."Mackinac Spring" is a beadwoven necklace starting with a herringbone chain in three colors and sizes seed beads. It is enhanced with freeform peyote stitch "leaves" and two lampworked floral beads from Lisa Kan's "Botanical" series.
Available for purchase here.
Monday, March 28, 2011
Touring Michigan - Grand Rapids Public Museum
We had to catch a 7:30am train to Chicago last week out of Grand Rapids, so we arrived the previous afternoon and took in a couple of museums, including the Grand Rapids Public Museum. The entry hall is visually exciting, with a gigantic working steam engine, a biplane, an entire suspended whale skeleton and a huge clock tower.


There is a huge range of exhibits and items on display; I was especially intrigued by the following displays:
Anishinabek: The People of This Place
This hall shares the stories of the original Ottawa, Potawatomi and Chippewa people of West Michigan; many direct descendants still live in the region today.
Unlike many exhibits of this type, there was no effort to sugarcoat the past; the experiences of the people, both good and bad, is presented, in their own voices.
The artifacts on display are fabulous, such as this quill work basket:
and a photograph of the maker with her beautiful creation:

Many pieces of beadwork too:

Streets of Old Grand Rapids
This display is a 3/4 scale detailed re-creation of Grand Rapids in the 1890s, including eleven shops based on actual businesses and buildings. The storefronts and interiors are stocked with real merchandise from the past. My favorite was the Voigt-Herpolsheimer Department Store, with this interesting advertising piece:

And look at the shoes!

Also parasols, ribbons, lace, and other fancy work - I wish I could go shopping there, at 1890 prices, of course!

Admission includes a ride on the 1928 Spillman carousel - I love carousels!

The current temporary exhibit is "Bodies Revealed"; the exhibit shows 14 full body human specimens and over 200 organs and is rooted in the historical precedent set by anatomists as Vesalius and da Vinci. The body specimens ares dissected to reveal the function of each anatomical system and to show that system’s relationship to the body as a whole.
The key to this exhibit is the polymer preservation process; a technique in which human tissue is permanently preserved using liquid silicone rubber. The end product is a dry, odorless specimen that resists decomposition.
This isn't the type of exhibit that will appeal to everyone, but I found it to be fascinating. It was requested that no photographs be taken, which I respected. However, there are many photographs online if you're interested.
Luckily, this steampunk sculpture was not part of the exhibit - he's fascinating too.

We also visited the Grand Rapids Art Museum; they were between major shows, but it was still an enjoyable visit.
It's still possible to see some of the Art Prize 2010 pieces throughout the city; we saw enough to convince us that we MUST make it to Art Prize 2011.
Sunday, March 20, 2011
Shooting the Moon
I stayed up waaaay too late last night, trying to catch the "Super Moon"; a full moon of rare size, a super "perigee moon"--the biggest in almost 20 years.
"The last full Moon so big and close to Earth occurred in March of 1993," says Geoff Chester of the US Naval Observatory in Washington DC. "I'd say it's worth a look."
Full moons vary in size because of the oval shape of the Moon's orbit. It is an ellipse with one side (perigee) about 50,000 km closer to Earth than the other (apogee). Nearby perigee moons are about 14% bigger and 30% brighter than lesser moons that occur on the apogee side of the Moon's orbit.
I managed several detailed shots:

And then I started playing, silhouetting various bits of plant life in front of the moonlight:


This one is my favorite, a glowing orb cradled in cedar fronds:

"The last full Moon so big and close to Earth occurred in March of 1993," says Geoff Chester of the US Naval Observatory in Washington DC. "I'd say it's worth a look."
Full moons vary in size because of the oval shape of the Moon's orbit. It is an ellipse with one side (perigee) about 50,000 km closer to Earth than the other (apogee). Nearby perigee moons are about 14% bigger and 30% brighter than lesser moons that occur on the apogee side of the Moon's orbit.
I managed several detailed shots:
And then I started playing, silhouetting various bits of plant life in front of the moonlight:


This one is my favorite, a glowing orb cradled in cedar fronds:

Friday, March 18, 2011
Spring? Maybe...

It's been tough shooting images for my 365 Project lately, everything just seems so tired, worn out and as abandoned as this nest from last year.
But there are a few encouraging signs, the birds are becoming more active and visible, especially the crows. I'm hearing cardinals calling and courting, it always sounds to me as if the males are saying "I'm so pretty, pretty, pretty" - which, of course, is completely true!

There's no activity in this greenhouse yet, the pots patiently waiting to be put to use.

But I did notice this very pleasant sight today - bright, new, green growth, a preview of blooms to come - soon I hope!

Saturday, March 12, 2011
Sheer Delight
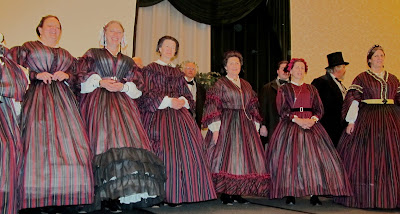
One of the features of the annual Ladies & Gentlemen of the 1860's conference is the "conference fabric"; each member of the faculty is sent the same fabric, a dress length for ladies and a vest length for men, with the instructions "make a dress (or a vest)", 1860's style of course!
Having been a member of the faculty three times now myself, I know that those packages are opened with a mixture of anticipation and trepidation - what if you just don't like it?
This year's fabric was just lovely, a predominantly red and black stripe, with just a bit of purple and yellow and quite sheer - note how you can clearly see the fancy petticoat beneath this example.


Saturday morning begins with the entire faculty up on stage, with each telling us a bit about the choices they made in the construction of their garment. You aren't required to construct your dress or vest yourself, but many people do, again it's your choice.
It's the details that make the difference, here a sleeve detail was replicated from a CDV:

Some replicate an original garment; this dress has no shoulder seam, the fronts and back were cut as one piece, as seen in a dress in the collection of the Shippensburg Fashion Archives.
 Some people choose a certain color to emphasize, here the bit of yellow in the stripe was used for trim and accessories:

By careful pleating, black is the predominant color on this bodice:

This was one of my favorites, with the use of the stripe cut on the bias for trim, alas, I'm far too old for this style!

Special details of an ensemble are also frequently shared, like this covered cage:


A couple years ago, I wore one of my conference dresses to an event... as did two other ladies! We were asked to come up as group at the fashion show; it was amazing how long it took for the spectators to realize we were all wearing the same fabric.
It's all about the details: by making carefully considered choices, it's quite possible to express your own sense of style while staying well within the parameters of true period fashion.
Having been a member of the faculty three times now myself, I know that those packages are opened with a mixture of anticipation and trepidation - what if you just don't like it?
This year's fabric was just lovely, a predominantly red and black stripe, with just a bit of purple and yellow and quite sheer - note how you can clearly see the fancy petticoat beneath this example.
Saturday morning begins with the entire faculty up on stage, with each telling us a bit about the choices they made in the construction of their garment. You aren't required to construct your dress or vest yourself, but many people do, again it's your choice.
It's the details that make the difference, here a sleeve detail was replicated from a CDV:
Some replicate an original garment; this dress has no shoulder seam, the fronts and back were cut as one piece, as seen in a dress in the collection of the Shippensburg Fashion Archives.
Some people choose a certain color to emphasize, here the bit of yellow in the stripe was used for trim and accessories:By careful pleating, black is the predominant color on this bodice:
This was one of my favorites, with the use of the stripe cut on the bias for trim, alas, I'm far too old for this style!
Special details of an ensemble are also frequently shared, like this covered cage:
Some people cloth more than just themselves - Emily also has a new conference dress, many of us are quite envious of Emily's extensive wardrobe and jewelry.

Here's one of the gentlemen, with his new vest:

I'm always amazed at how everyone manages to imprint the fabric with their own unique perspective; yes, it's obvious that the same fabric has been used, but it's definitely not "cookie cutter" effect.


A couple years ago, I wore one of my conference dresses to an event... as did two other ladies! We were asked to come up as group at the fashion show; it was amazing how long it took for the spectators to realize we were all wearing the same fabric.
It's all about the details: by making carefully considered choices, it's quite possible to express your own sense of style while staying well within the parameters of true period fashion.

Thursday, March 10, 2011
La Petite Fleuriste - Advanced Level
Last March, I was fortunate to be a student in a faux flower making class based on mid-19th century techniques, offered by Martha McCain. When I heard that an advanced class was available this year, I jumped at the opportunity.
This year, class was an all day event; we would be creating a poppy, a morning glory and a cornflower, expanding on the techniques we had learned previously.
We entered to find our supplies waiting for us:

Martha had prepared the starched silk in advance for us, but we would be creating our own stamens and centers this time.
As many parts needed time to dry between steps, we worked on all three blossoms throughout the day.
The first step was cutting all the various petals, corollas, etc from silk - basic botany knowledge is a definite plus when assembling flowers!
We started by creating stamens; repeatedly dipping waxed linen threads in colored gum arabic and allowing them to dry between dips.
The cornflower needed to goffered - shaped using a hot metal tool. The goffering tools are in a variety of sizes and shapes, each has it's own particular use.


The silk is dampened before goffering; it takes practice and deft hand to obtain the desired shape without scorching the fabric.

After goffering, each flower shape was tightly wrapped around the tip on awl and allowed to dry.
 A teaching board, with the various stages of construction:

That little blue twist is what you end up with after twisting on the awl - it sure doesn't look very flower like at this point!
But after wiring the stamens together and carefully adding three "fluffed" little blue twists and binding it all together, here's the result:

We started by painting blue dye onto white silk for our morning glory blossom and bud - I should have left a bit more white showing - and allowing them to dry.

In the meantime, a poppy center needs to be formed, by creating a stuffed silk "lolly pop", embellished with just a bit of embroidery and 48 stamens:

After the petals have dried, they need to be colored:

The period references call for "china ink", but Martha was unable to find modern black ink that was colorfast, so black fabric markers were substituted.
Just a bit more assembling and voila - a poppy!

I can't say how much I enjoyed this class (okay, there were some frustrating moments when all the flower parts were NOT cooperating).
Martha and her husband invested countless hours in preparing materials, tools and supplies and I'm deeply appreciative of all their efforts.
I'm seriously considering prepping everything needed to present a flower-making sweatshop scenario to the public - but first I need to convince my friends that they really do want to be a wage slave for a weekend...and the wages would consist of flowers!

This year, class was an all day event; we would be creating a poppy, a morning glory and a cornflower, expanding on the techniques we had learned previously.
We entered to find our supplies waiting for us:
Martha had prepared the starched silk in advance for us, but we would be creating our own stamens and centers this time.
As many parts needed time to dry between steps, we worked on all three blossoms throughout the day.
The first step was cutting all the various petals, corollas, etc from silk - basic botany knowledge is a definite plus when assembling flowers!
We started by creating stamens; repeatedly dipping waxed linen threads in colored gum arabic and allowing them to dry between dips.
The cornflower needed to goffered - shaped using a hot metal tool. The goffering tools are in a variety of sizes and shapes, each has it's own particular use.
The silk is dampened before goffering; it takes practice and deft hand to obtain the desired shape without scorching the fabric.
After goffering, each flower shape was tightly wrapped around the tip on awl and allowed to dry.
A teaching board, with the various stages of construction:That little blue twist is what you end up with after twisting on the awl - it sure doesn't look very flower like at this point!
But after wiring the stamens together and carefully adding three "fluffed" little blue twists and binding it all together, here's the result:
We started by painting blue dye onto white silk for our morning glory blossom and bud - I should have left a bit more white showing - and allowing them to dry.
 Creating the center was a multi-step process, involving wire, cotton, waxed thread, starch, glue, paint and gum arabic. It's time intensive, but provides great results.
The flower is glued along the center seam, goffered to shape and bound together. The little bud is formed from that square with a blob of blue dye in the center and amazingly enough, when twisted and assembled results in a very realistic bud.

My favorite is the poppy; shaping the petals takes an interesting technique - each petal is folded in half and twisted in a damp bandanna on a bias fold (thank you to all my hand models in the following shots!)


In the meantime, a poppy center needs to be formed, by creating a stuffed silk "lolly pop", embellished with just a bit of embroidery and 48 stamens:

After the petals have dried, they need to be colored:

The period references call for "china ink", but Martha was unable to find modern black ink that was colorfast, so black fabric markers were substituted.
Just a bit more assembling and voila - a poppy!
I can't say how much I enjoyed this class (okay, there were some frustrating moments when all the flower parts were NOT cooperating).
Martha and her husband invested countless hours in preparing materials, tools and supplies and I'm deeply appreciative of all their efforts.
I'm seriously considering prepping everything needed to present a flower-making sweatshop scenario to the public - but first I need to convince my friends that they really do want to be a wage slave for a weekend...and the wages would consist of flowers!

Subscribe to:
Posts (Atom)
