Showing posts with label period correct. Show all posts

Monday, April 4, 2016

Historical Food Fortnightly: Challenge #7 Pretty as a Picture


I just have to start by saying EPIC FAILURE!!!!!!!!!!


Not only is NOT "Pretty as a picture", it tastes like paste!

I decided to attempt to recreate a mid-19th century molded dessert: jellies, cremes, blancmange or flummery. They are just so pretty!


However, I don't have easy access to either isinglass or calves feet to make my own gelatine, so I decided to try a flummery.

The original flummery was a kind of oatmeal broth or porridge. Over time, other grains came into use, in particular, rice - probably as the resulting flummery would be a pristine white.


RICE FLUMMERY

Boil with a pint of new milk a bit of lemon-peel and cinnamon; mix with a little cold milk as much rice flour as will make the whole of a good consistence; sweeten, and add a spoonful of peach-water, or a bitter almond beaten; boil it observing it does not burn; pour it into a shape,or pint basin, taking out the spice; when cold, turn the flummery into a dish, and serve with cream, milk or custard, round, or put a tea-cupful of cream into a half a pint of new milk, a glass or white wine, half a lemon squeezed and sugar.

The Date/Year and Region: 1837 America

How Did You Make It:

I looked at many, many receipts for rice flummery; one suggested that rice ground in a hand-mill worked better than purchased rice flour. Another suggested allowing the rice and milk to soak overnight before boiling. Only one suggested using specifically "Carolina" rice.

I had several kinds of rice in the cabinet, plain white, jasmine, arborio, brown and even green; I decided to use the arborio, as the point seemed to be extract as much starch as possible.

I soaked it overnight and then boiled it, which resulted in a saucepan of goop. I strained it to remove the lemon peel, cinnamon and larger bits of ground rice.

Then into a fancy mold and the refrigerator, until well chilled. My attempts to unmold it failed utterly, so I scooped it into the bowl and surrounded it with cranberry sauce (receipt below) - I found many references to combining flummery and fruit.

Time to Complete: Hands on time, maybe 30 minutes. Complete time, 24 hours.

Total Cost: Unknown, everything came from the pantry or freezer, but probably less than $2.00.

How Successful Was It?: HORRIBLE! It looked bad and tasted worse, like lemony paste.
Will NOT be making this again. The cranberry sauce was fine.

How Accurate Is It?:  Well, my hand-mill was my blender and, of course, an electric stove and refrigerator. The choice of rice type was a guess, I've not spent any time researching 19th century rice.


Mrs. Ellis's Housekeeping Made Easy, Or, Complete Instructor in All Branches of Cookery and Domestic Economy : Containing the Most Modern and Approved Receipts of Daily Service in All Families, circa 1843, provided the following receipt for cranberry sauce.


"Cranberry Sauce.—Wash a quart of ripe cranberries, and put them into a pan with about a wine-glass full of water. Stew them slowly, and stir them frequently, particularly after they begin to burst. They require a great deal of stewing, and should be like a marmalade when done. Just before you take them from the fire, stir in a pound of brown sugar."

Sunday, April 3, 2016

Fabric for the Ladies: The Civilian Symposium 2016


The Civilian Symposium is full of highlights, but the most anticipated is the reveal of the "fabric" - each year all the female presenters receive a dress-length of fabric, with the instructions of "make a garment." Gentlemen receive a vest-length of a differing fabric.

This years fabric was an Italian cotton, in a fairly large scale, woven plaid. It had a very fine hand, much more like a wool challis than cotton.

The reveal looks a bit like this, except multiplied times 4 or 5!


Once in a while, the fabric immediately "speaks" and tells me exactly what it would like to become; other times (this time) it remains silent,leaving me to figure it out alone.

I started going through the many, many photos of original garments I've taken over the years and then through all the books and exhibit catalogs in my library.

Doing so caused my to notice something: plaids of this scale were nearly always wool or silk, not cotton. But I did come up with some possibilities:

1.) This one is in the Kent State University Museum collection. I've always liked the "bodice trimmed like a jacket" concept, but haven't yet constructed one. I also happen to have yards and yards of pale blue soutache that I could have used for the trim. But I decided against it; the fabric just seemed to casual for this dress.


2.) This a wool dress, the plaid being approximately the same scale as the provided cotton. The peplum, is actually a separate belt.It would have been a good choice, but it just didn't thrill me - I prefer something that will be a bit more of a challenge to figure out.


3.) This was my fall-back: if I didn't come up with any other ideas, I would make this one - at least it had an interesting sleeve! But I did find something else...


I had a chance to go off Island and took the opportunity to look for some coordinating fabric that might open up the possibilities:


Which lead to...
4.) But I came to the conclusion that the plaid was just too big, the sash would have been 20" wide!


Maybe a late 50's look?

5.) I drafted out this "tunic body" and even managed to make it fit with some tweaking, but it just would NOT work in the plaid - too many lines and angles coming together in strange ways. I do plan to make this in a solid silk or wool.


AND THEN I FOUND IT!!!!!

6.) Something interesting that would provide a slight challenge!


The fashion plate dates to November of 1859, I wasn't able to find a written description, but I'm fairly certain that either silk or wool was suggested.However, the cotton felt and behaves so much like a thin wool, I  decided to go for it.

Do to fabric constraints, I went with a small 90" hoop. I would have liked to suspend the bottom flounce from the top of the trim fabric, so it would look like a separate skirt, but there just wasn't enough fabric. I also plan on adding one more bow. I decided against going with a true pagoda, but did create a full bottom flounce for the sleeve and added a large open undersleeve.

And here are the other presenters:

Thursday, February 11, 2016


The Challenge: History Detective

The Recipe: Cinderellas or German Puffs From Miss Leslie's Directions for Cookery

Sift half a pound of the finest flour. Cut up in a quart of rich milk, half a pound of fresh butter, and set it on the stove, or near the fire, till it has melted. Beat eight eggs very light, and stir them gradually into the milk and butter, alternately with the flour. Add a powdered nutmeg, and a tea-spoonful of' powdered cinnamon. Mix 'the whole very well to a fine smooth batter, in which there, must be no lumps. Butter some large common tea-cups, and divide the mixture among them till they are half full or a little more. Set them immediately in a quick oven, and bake them about a quarter of an hour. When done, turn them out into a dish, and grate white sugar over them. Serve them up hot, with a sauce of sweetened cream flavoured with wine and nutmeg; or you may eat them with molasses and butter; or with sugar and wine. Send, them round whole, for they will fall almost as soon as cut.

The mystery I hoped to solve regarded the name: why "German" puffs or for that matter, Cinderellas?

The Date/Year and Region: 1851, United States

How Did You Make It: 


Putting this together was fairly straightforward, as all the ingredients were normal pantry items.


What took the longest was grating the cinnamon - yes, I have grated cinnamon in the cabinet, but I was trying to keep this period, and fresh is better anyway.


All my teacups are antique, and I wasn't willing to put them in the oven, so I substituted 6 oz ramekins. I wasn't really sure what constituted a "quick" oven, so started at 375; after 15 minutes they were no where close to done, so I increased the temperature to 400 and they cooked for another 15 minutes.

Aren't they pretty?


And then they fell, immediately upon being removed from the ramekins!


Time to Complete: 

About 45 minutes, as I said previously, these were very easy to put together. They would have baked more quickly had I started with a higher temperature oven.

Total Cost:

Probably less than $2.00, I had all the ingredients on hand.

How Successful Was It?: 


I chose to serve these with the sweetened cream and nutmeg option; they were quite good, not the super-sweet typical dessert of today, but very pleasant and not as rich as might be expected given all the butter and eggs.

From a flavor and ease of making standpoint, these were a success. From the standpoint of solving the mystery of the names - FAILURE!

I found versions of this receipt in a number of different published cookbooks, over quite a range of time; the earliest was 1837, the latest 1896. All were remarkably similar.

These are obviously what would typically be called a popover today, but all the references I found consider popovers to be an American version of Yorkshire pudding and similar batter puddings made in England since the 17th century.

The Encyclopedia of American Food and Drink does have a reference for Cinderellas, defining then as a muffin flavored with wine or sherry and nutmeg and claims the name derives from the muffin;s "fancy" appearance as Cinderella transformed from a servant girl to a princess - these don't look especially "fancy" to me!.

I am inclined to believe these derive from the traditional baked German pancakes or as they are commonly called today "Dutch babies", but I wasn't able to definitively confirm this.

How Accurate Is It?: 

All ingredients purchased at a conventional grocery store and baked in a modern electric oven.

I did cut the recipe in half, as I only had 4 eggs. It was just as well, as this made 6 good sized popovers and there are only two of us in the house.

I'm fairly certain that the wine for the sweetened cream should have been a sherry or Madeira, however, I did not have either, so I substituted a bit of apple ice wine.

Sunday, January 17, 2016

The Historical Food Fortnightly 2016 Challenge - Meat and Potatoes Part 2


I'm really not the overachiever that this double submission might suggest; I just needed the leftovers from #1 in order to create #2!

The Challenge: Meat and Potatoes

The Recipe: Beef Cakes from Miss Leslie's Directions for Cookery

BEEF CAKES.

Take some cold roast beef that has been under-done, and mince it very fine. Mix with it grated bread crumbs, and a little chopped onion and parsley. Season it with pepper and salt, and moisten it with some beef-dripping and a little walnut or onion pickle. Some scraped cold tongue or ham will be found an improvement. Make it into broad flat cakes, and spread a coat of mashed potato thinly on the top and bottom of each. Lay a small bit of butter on the top of every cake, and set them in an oven to warm and brown.

Beef cakes are frequently a breakfast dish.

Any other cold fresh meat may be prepared in the same manner.


Those readers who have met "Sgt. Beef Cake" will understand why I was drawn to try this receipt!

The Date/Year and Region: 1851 United States

How Did You Make It:


Taking the leftovers from Meat and Potatoes Part 1, I mashed the potatoes with a bit of butter and milk. The beef was minced as small as possible and a handful of grated bread crumbs was added along with a small chopped onion, salt, pepper and dried parsley. I skipped the walnut or onion pickle as well as the tongue or ham, as I had none. I mixed in the beef dripping and found that I needed to significantly more bread crumbs in order to form a "cake". I couldn't manage to get the cake to hold together well enough to spread with the mashed potatoes, so I placed a "smear" of potatoes on the sheet pan, placed the cake on the "smear" and then added more potatoes on top. A bit of butter was placed on each cake.


and into a 350 degree oven they went:


I let them cook about half an hour, and out they came:


Time to Complete: About an hour and half total, much of that spent hand mincing the beef.

Total Cost: The entire roast was $9.53, only used half for this meal, potatoes $1.00, onion $0,10, milk and butter $0.25, salt, pepper and parsley in the cupboard - approximately $5.61.

How Successful Was It?:


Very tasty!!!! Robin told me to "put it in the book", a notebook where recipes we've tried and considered good enough to make again go.

Probably would have been more successful in forming a firm cake if I had been able to mince the beef finer.

How Accurate Is It?:

Ingredients wee purchased at a mainstream grocery store, so not heirloom unfortunately. My access to good ingredients is currently limited due to living on an island in northern Michigan, access will improve come May.

Cooked in an electric oven.


Thursday, January 14, 2016

The Historical Food Fortnightly 2016 Challenge - #1 Meat and Potatoes Part 1


I've been following the Historical Food Fortnightly for a couple years now, but wasn't able to join in due to major health issues, but I'm in this year! Perhaps not for the full marathon, but definitely at least a half marathon.

So how does this work?

From the site:

"Every fortnight we will feature a themed challenge. Your mission is to take each challenge and cook, bake, or otherwise prepare a food item or dish from a historic recipe the way it was meant to be prepared and consumed.

Your creations can be as elaborate or simple as you like, and can definitely be chosen to suit your skills and interests. You can choose to participate in as many challenges as you like - you can pick and choose the challenges that interest you, and you can choose the ones that work in your schedule. The most popular ways to participate are to do a marathon (completing all the challenges, for the craziest/most masochistic among us) or a half-marathon (doing every other challenge). How you participate is up to you and your comfort level, though we hope that everyone will choose to step outside the box and stretch themselves.

The emphasis here is on research and documentation, and the goal is to learn more about historic cooking through experience and trial. We believe that a better understanding of the past comes from doing things with an eye towards authenticity and accuracy, and from good, solid research about how things were done and why. We encourage everyone to research each recipe and to document their research so that we all can learn from each other.

Our definition of “historic” is anything before 1960, so your recipes should be documented to a date before then. Other than that, it is wide open to anything for which you can find documentation. You also need not limit yourself to one era - feel free to hop around as much as you like."


I will be submitting challenge results based on the mid-19th century, having been involved in living history from that era for nearly twenty years.

Here we go with Challenge #1!

The Challenge: Meat and Potatoes

The Recipe: Baked Beef from Miss Leslie's Directions for Cookery

. BAKED BEEF.

This is a plain family dish, and is never provided for company.

Take a nice but not a fat piece of fresh beef. Wash it, rub it with salt, and place it on a trivet in a deep block tin or iron pan. Pour a little water into the bottom, and put under and round the trivet a sufficiency of pared potatoes, either white or sweet ones. Put it into a hot oven, and let it bake, till thoroughly done, basting it frequently with its own gravy. Then transfer it to a hot dish, and serve up the potatoes in another. Skim the gravy, and send it to table in a boat.

Or you may boil the potatoes, mash them with milk, and put them into the bottom of the pan about half an hour before the meat is done baking. Press down the mashed potatoes hard with the back of a spoon, score them in cross lines over the top,'and let them brown under the meat, serving them up laid round it.

Instead of potatoes,, you may put in the bottom of the pan what is, called a Yorkshire pudding, to be baked under the meat.

To make this pudding,—stir gradually four table-spoonfuls of flour into a pint of milk, adding a salt-spoon of salt. Beat four eggs very light, and mix them gradually with the milk and flour. See that the batter is not lumpy. Do not put the pudding under the meat at first, as if baked-too long it will be hard and solid. After the meat has baked till the pan is quite hot and well greased with the drippings, you may put in the batter; having continued stirring it till the last moment.

If the pudding is so spread over the pan as to be but an inch thick, it will require about.two hours baking and need not be turned. If it is thicker than an inch, you must (after it is brown on the top) loosen it in the pan, by inserting a knife beneath it, and having cut it across into four pieces, turn them all nicely that the other side may be equally done.

But this pudding is lighter and better if laid so thin as not to require turning.

When you serve up the beef lay the pieces of pudding round it, to be eaten with the meat.

Veal may be baked in this manner with potatoes or a pudding. Also fresh pork.

The Date/Year and Region: 1851 United States

How Did You Make It: 


Disclaimer: We seldom eat beef and I even more rarely cook beef, so this was quite an experiment!

As there are only two of us, I purchased the smallest English roast possible, as this was not actually the "Meat and Potatoes" dish that I wanted to create, but I did need the leftovers to create my desired dish.

While I do have a cast iron Dutch oven, I do not have a trivet to place inside it, so I substituted a couple of Pyrex ramekins.

Prepped for the oven:


After cooking:


And for modern tastes, it was overcooked. I've not found a reference to the desired doneness of beef during the mid-19th century, however, Miss Leslie states that carrots should be boiled for THREE hours, so perhaps it wasn't overdone by period standards.

Time to Complete: Approximately 2 hours.

Total Cost: The entire roast was $9.53, only used half for this meal, potatoes $1.00, salt in the cupboard - approximately $5.26.

How Successful Was It?: 


As above, the beef was overdone for modern taste, although it had good flavor, as did the potatoes. As was common during the period, I also served preserves ( green tomato chow chow and rhubarb chutney) on the side to add to the beef - I had made these previously for another project using period receipts. I also served glazed carrots (not made from a period receipt) to round out the meal., 


Without the preserves, it would have been rather bland, but was not unpleasant.


How Accurate Is It?: 

Ingredients were purchased at a mainstream grocery store, so not heirloom unfortunately. My access to good ingredients is currently limited due to living on an island in northern Michigan, access will improve come May.

Cooked in an electric oven and without a cast iron trivet.

Coming soon Meat and Potatoes - Part 2!

Wednesday, January 6, 2016

Found Another One!


I have a somewhat odd obsession: attempting to match surviving mid-19th century stitched artifacts to period published patterns.

And I've found another one!!!

The ubiquitous "Mrs. Jane Weaver" has presented us with a "Head-Dress for Breakfast" in the October 1864 Peterson's Magazine, described as follows:

Take a simple square of white tarleton, trim with narrow black ribbon, and pin it quite forward on the front of the head; and you have the head-dress complete. 

And I've previously created my interpretation, based on the original artifact, several years ago.

This is a case of finding something completely off topic while researching a specific topic; it seems to happen nearly every time I leaf through my Godey's and Peterson's, one of the reasons I prefer to take the time to go page by page, as opposed to doing an online search.


Here's the original artifact, the resemblance to Mrs. Jane Weaver's depiction is striking, although not identical; the maker altered the materials and colors to suit her needs.


And here's my interpretation, again altered a bit to suit my needs. Complete details here.

Friday, May 23, 2014

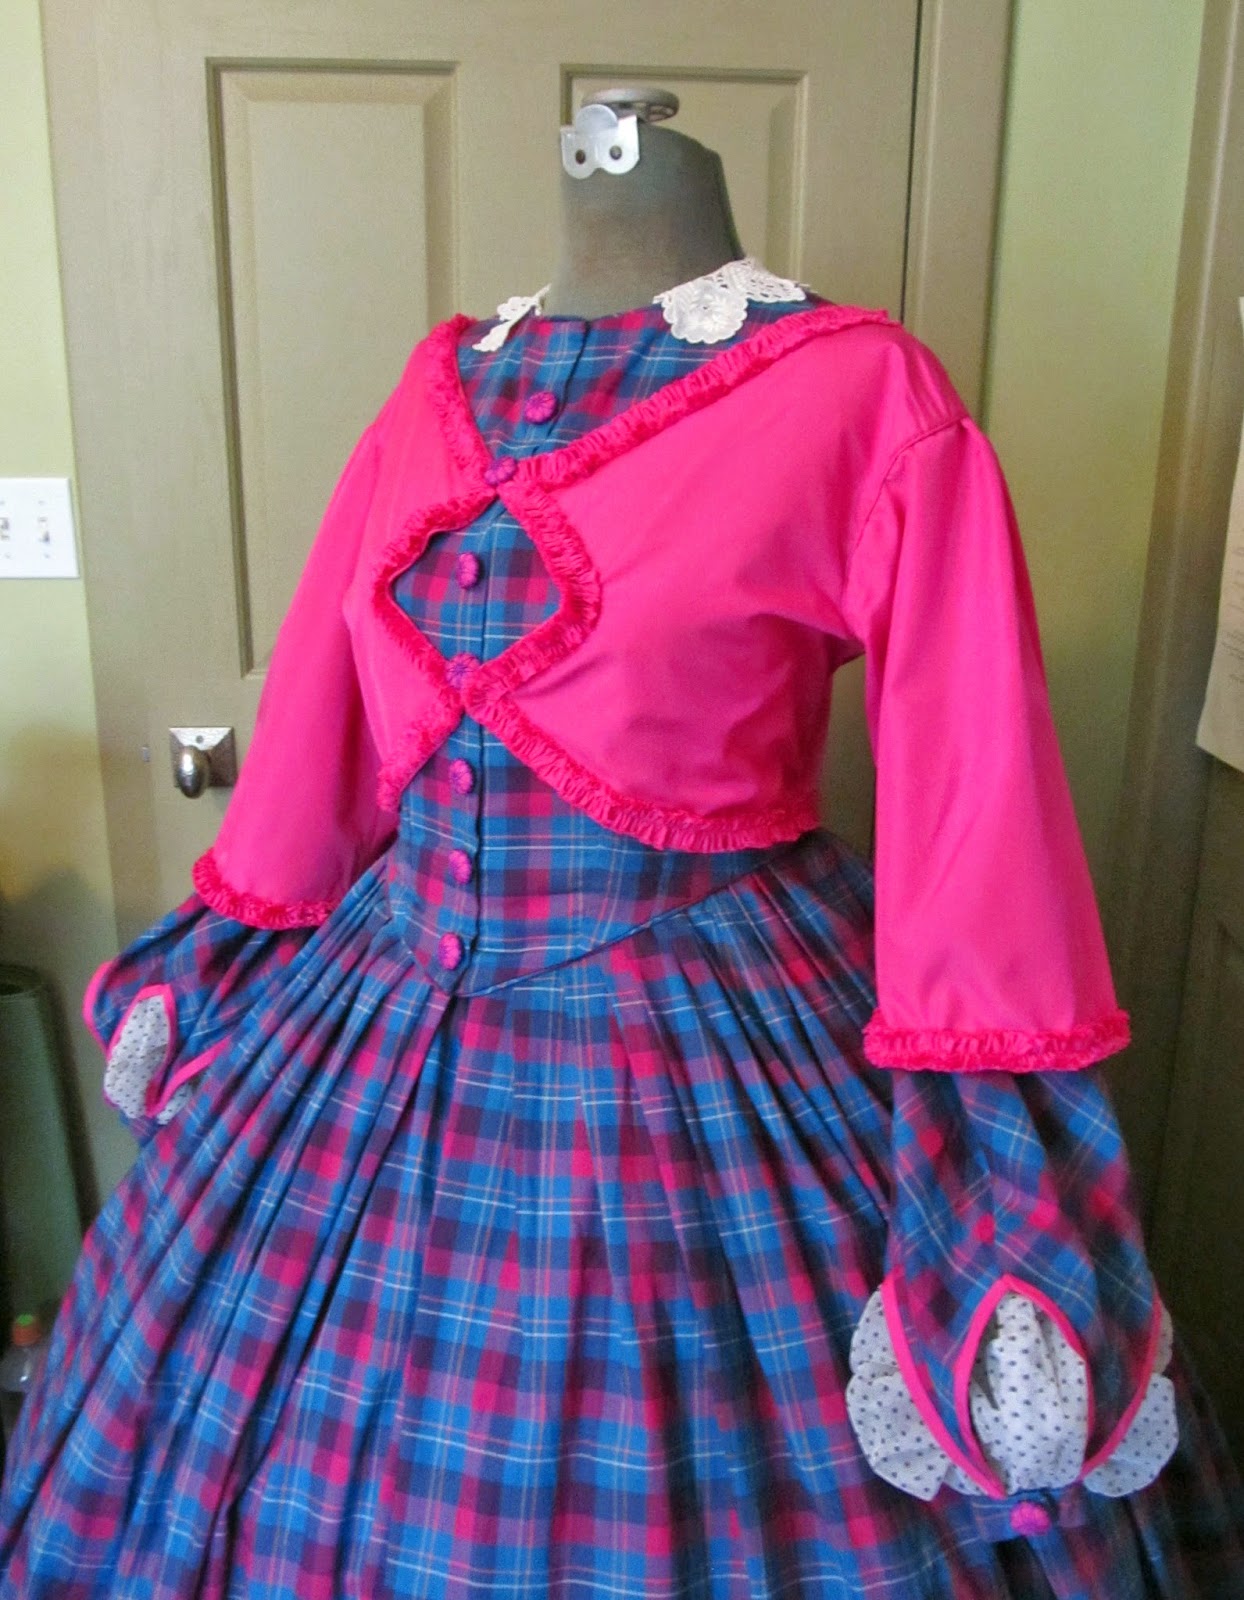
2014 Conference Fabric - Fabric for the Ladies


One of the annual highlights of the Ladies & Gentlemen of the 1860's conference is the Saturday morning reveal of the "conference fabric" - each faculty member receives a piece, a dress length for the ladies and a different fabric for the men, typically enough to make a vest. It's always amazing to see how different the same fabric can look made up, depending on the choice of trims, placement, etc.

I always have both a sense of excitement and apprehension when I open up the package- like it or not, it must be made into a garment and worn. I'll admit u front, this is not a fabric I would have chosen for myself, but it has grown on me a bit as time has passed.

The fabric is a fine Italian cotton, with a lovely hand. I felt the colors would have been more typically used on wool or silk in the period, which was confirmed by Carolann when she described the fabric during the "Reveal".

With a fabric this bright and bold, there's only two options: attempt to tone it down or embrace and enhance the color. Most participants went with the tone it down option.

But when I went through my fabric stash and found this perfectly matching length of silk poplin, my choice was made: Embrace it or as a friend described it, "you bear- hugged it into submission".


I used a fashion plate (the lady on the left) and a sleeve detail from an original garment as inspiration.


My approach with the fashion plate was not to create a duplicate, but instead to interpret the details into my garment; I believe this is more the way fashion plates were used at the time, as opposed to being literally copied.


I did not have fabric to create the double skirt, but did have enough to place trim with the same dagged shape - I did not have this done for conference but added it later.


The bodice has a slightly pointed front and is trimmed with fancy buttons. I'll be posting more about the buttons in a subsequent post.


The sleeves are bishop style, with a twist - ending in points and brought back together at the cuff. The require a full undersleeve to hang properly, in this case, made of black spotted netting. Yes,I combined plaid and polka dots.


It wasn't clear in the fashion plate if the jacket was a true jacket or trim applied to look like a jacket. I decided to go with a true jacket, to give a little more versatility.


So there it is, the "diamond dress" - I'll be wearing it at Greenfield Village this weekend, see you there!