Showing posts with label dresses. Show all posts

Sunday, April 3, 2016

Fabric for the Ladies: The Civilian Symposium 2016


The Civilian Symposium is full of highlights, but the most anticipated is the reveal of the "fabric" - each year all the female presenters receive a dress-length of fabric, with the instructions of "make a garment." Gentlemen receive a vest-length of a differing fabric.

This years fabric was an Italian cotton, in a fairly large scale, woven plaid. It had a very fine hand, much more like a wool challis than cotton.

The reveal looks a bit like this, except multiplied times 4 or 5!


Once in a while, the fabric immediately "speaks" and tells me exactly what it would like to become; other times (this time) it remains silent,leaving me to figure it out alone.

I started going through the many, many photos of original garments I've taken over the years and then through all the books and exhibit catalogs in my library.

Doing so caused my to notice something: plaids of this scale were nearly always wool or silk, not cotton. But I did come up with some possibilities:

1.) This one is in the Kent State University Museum collection. I've always liked the "bodice trimmed like a jacket" concept, but haven't yet constructed one. I also happen to have yards and yards of pale blue soutache that I could have used for the trim. But I decided against it; the fabric just seemed to casual for this dress.


2.) This a wool dress, the plaid being approximately the same scale as the provided cotton. The peplum, is actually a separate belt.It would have been a good choice, but it just didn't thrill me - I prefer something that will be a bit more of a challenge to figure out.


3.) This was my fall-back: if I didn't come up with any other ideas, I would make this one - at least it had an interesting sleeve! But I did find something else...


I had a chance to go off Island and took the opportunity to look for some coordinating fabric that might open up the possibilities:


Which lead to...
4.) But I came to the conclusion that the plaid was just too big, the sash would have been 20" wide!


Maybe a late 50's look?

5.) I drafted out this "tunic body" and even managed to make it fit with some tweaking, but it just would NOT work in the plaid - too many lines and angles coming together in strange ways. I do plan to make this in a solid silk or wool.


AND THEN I FOUND IT!!!!!

6.) Something interesting that would provide a slight challenge!


The fashion plate dates to November of 1859, I wasn't able to find a written description, but I'm fairly certain that either silk or wool was suggested.However, the cotton felt and behaves so much like a thin wool, I  decided to go for it.

Do to fabric constraints, I went with a small 90" hoop. I would have liked to suspend the bottom flounce from the top of the trim fabric, so it would look like a separate skirt, but there just wasn't enough fabric. I also plan on adding one more bow. I decided against going with a true pagoda, but did create a full bottom flounce for the sleeve and added a large open undersleeve.

And here are the other presenters:

Saturday, September 14, 2013

A Fashion Timeline


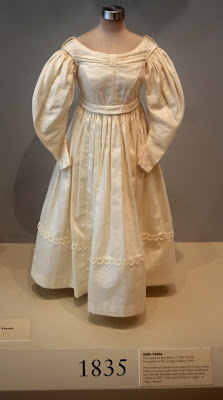
We recently visited the Indianapolis Museum of Art and encountered this fashion timeline - all constructed of plain cotton fabric and only about three foot tall.

The signage encouraged touching and even gave directions on what to look for underneath, for instance, the cage crinoline under the 1860 example.


I found it to be very well done - the use of a single neutral fabric, really highlighted the lines of each dress, without overlooking the typical placement of trimmings for each era.

I was also pleased by each having proper underpinnings too; I know I've frequently been asked "what's under there" when dresses in period clothing and I'll usually oblige with an explanation and a bit of lifting my skirts.

Perhaps another project....


Sunday, August 25, 2013

Make-do Hat


I had great intentions last year, to create a hat to wear with my bathing costume, during our two mile stroll down to the water - but it didn't happen.

And I had great intentions this year, to create a fanchon bonnet to wear with my 1868 dress when we attended the vintage baseball game and held our picnic - but it didn't happen and I even had the frame!


So I really needed a come up with a "make-do" hat quickly.

During the mid-19th century, hats were most commonly worn by girls or young women, but there were occasions when they were acceptable for a woman of "certain age" and picnics were one of those occasions. Additionally, they were also acceptable when visiting a watering place, such as Mackinac.

Ladies straw hats of the period typically had low crowns and shaped brims, the above image shows a very common style.

Here's a couple vintage images too:


So, on to my "make-do" version:


Unfortunately, I failed to take photos of the process. But I started with a cheapy straw from the craft store, that was in the Halloween box.

First,  I steamed and flattened the crown. Next I chopped about 3" off the brim. I wired the edge (hardware store wire, not millinery) and then covered the raw edge with grosgrain ribbon. Petersham would have been the proper thing to use, but I didn't have any and this was a "use what you have" project. A bit a shaping and I was making progress.

The final step was to add some simple ribbon trim - actually bonnet ties removed from a friend's bonnet, she didn't like the red and I replaced them for her. I didn't even iron out ends that had been gathered and fastened to the bonnet!


The red was a nice contrast to my dress and also coordinates well with my red and black bathing costume.


 Was it perfect? No!

Did it work for the weekend? YES!


I still plan to make the fanchon, but I rather like my sporty straw too!

Sunday, March 10, 2013

Conference Fabric 2013


Another eagerly awaited, annual highlight of the Ladies & Gentlemen of the 1860's conference is the unveiling of the "conference fabric" on Saturday morning.

Gentlemen presenters receive a vest length of fabric, this year a cotton velveteen, and the ladies receive a dress length, this year a black and white cotton print. Everyone receives the same fabric and makes (or has made by their seamstress or tailor) a garment, which is to be kept secret until the unveiling.


I am always amazed at how the choices made in styles and trims can lead to such different end results, with  the dresses in particular - there aren't as many variations possible in the vests.

A big thank you to my dear friend who took these photos for me - she sat on the floor in front of the stage in order to get clear shots!


Many participants use original garments or photos for inspiration, as with this sleeve variation - I love the green buttons!


Red was a great compliment to this fabric and this lady choose to use "red tape" as she works for the government and it's a great reproduction of the original dress in her collection.


 This is a great style, not often represented - an open neckline and short sleeves, worn with a guimpe and just look at the skirt detail!


Emily (the doll) in her new conference dress.


Another great example of using originals as inspiration - the yoke of this dress is shirred over gathered cords front and back - a really beautiful detail, and again, one seldom seen on reproductions.


And a bit of usually undercover detail: gorgeous garters! A class on making these garters was offered as a pre-conference workshop.


And the youngest attendee at conference, isn't he adorable in his conference fabric gown?


And he's the only participant to have both a conference dress AND a vest - a surprise gift during the unveiling.

I'll be adding detailed posts on what I created for Robin and myself with our conference fabrics...soon!

Sunday, August 5, 2012

In the Beginnings - An 1860's Fashion Show


Not too fashionable looking, am I?

Wash dress, apron, kerchief, and slat bonnet - basic garments that every female living historian should have and a great beginning to assembling a mid-19th century wardrobe.

Several years back, I was asked to present a fashion show at the annual Civil War event at Charlton Park, and I agreed - if I could do it my way.

So each show has a "theme" and this year I decided to address a question I frequently hear from spectators - no, not "Are you hot in those clothes?"  - but "How do you put together a wardrobe?"

We started by showing the underpinnings, chemise, corset,  drawers, petticoats, etc and explained WHY it's so important to have those layers before moving on to a dress - without the proper foundation, it's impossible to have the proper silhouette for the period.


We also discussed why under garments are the perfect place for a novice seamstress to practice - the skills used  can all be used in outer garments, and after all, if they aren't absolutely perfect, they won't be visible to the general public.


Skirt support was our next topic and also provided an opportunity to discuss research and trends in reenacting - we are both wearing corded petticoats, which for several years were the "in" thing, but further research has shown that by the war years, they were a bit of a rarity, having been replaced by the ubiquitous cage crinoline.


We also talked about the life cycle of garments - here we have what was previously a more fashionable dress, but it's become a bit faded and shabby and has now been relegated to work wear - think about the jeans that you now only wear when cleaning house. Clothing should be appropriate for the task at hand, why wear a fancy gown for messy tasks?

Another use for a dress past it's prime is to use it for yardage: just think how many aprons, slat bonnets, or children's garments a skirt could yield.


Removing that slat bonnet, apron and adding a plain white collar sure changed the look of my very basic dress!

Another versatile garment is a wrapper - great for early morning runs to the necessary without needing to get fully dressed and, due to the relatively loose fit, a very forgiving garment for the beginning seamstress. In this case, with permission, I shared the mistake made by the maker and her creative and appropriate solution - she had made her wrapper too short, but instead of discarding it, she added more fabric, running in the opposite direction to add length - it's a great solution, adds interest to the garment and looks intentional.


Here's another reason to start with a simple wash dress - you'll learn the skills to create a more fashionable gown. If you look closely, our basic dresses are very similar: fitted, gathered bodices and simple bishop sleeves. The difference is the finer fabric and bold trim of the dress on the left, as well as the stylish straw bonnet.

Here's another lovely example: striped sheer silk, with slim open sleeves worn over lace trimmed undersleeves, with a larger skirt support and accessorized with bonnet, gloves and reticule - she's ready to pay a call on friends!


 Again, the biggest differences between my wash dress and this gown suitable for visiting, are the fabrics and accessories - the rest is just details.


Despite having only a handful of models, I was able to share a huge amount of information with the viewers and they stayed to listen, standing in the sun on a 95 degree hot and humid day!