Sunday, October 12, 2014

A Charming Reveal


Three Pines Studio, in Cross Village, Michigan, started the summer season with a show that had Emily Dickinson  and her "Gorgeous Nothings" as inspiration and have chosen to end the season with another poet as inspiration: Walt Whitman.


From the call for entry for I COLLAGE MYSELF: Contemporary portraits of Ourselves and Our Experiences. A Tribute to Walt Whitman:

 "Poetry is important...It continues to stand the test of time maintaining its relevance. Its readers during Florentines of Dante's time found its phrases just as enthralling as the hipsters of our time. Poetry paints, sings, whispers, tests and twitters. The poet, Walt Whitman, continues to offer us a portrait of ourselves within the words of Song of Myself. Whitman embraced an art of fragments that encouraged him to 'cut and paste' his lines into ever-evolving forms based on what he called 'spinal ideas.' It is this method that relates to our current everyday collaging of interests and opinions on social media such as Facebook. Walt Whitman created portraits of our collective self - slices of life, farmers, sailors, dock workers, soldiers, etc." 

"It was his creative process of collaging phrases that hinted of the work of visual artists (who used the same technique with paper collage) such as Matisse, Braque and Picasso; who like Whitman, communicated thoughts and ideas through simple visual forms of color and shape. Creating their works of art and speaking to the reader or viewer through the visual fragments collaged created a whole. It is with this in mind that we are inspired to create our won art and invite others to do the same."

"In our call for artists we don't necessarily mean a self portrait. We mean a portrait of our lives today. Portrait means a collaboration of parts that come together collectively in the expression of works - whether in objective landscapes, figurative work or no-objective abstractions. It is the synthesis of these creative parts that create the whole."


For my piece, "A Cautionary Tale", I chose to focus on the concept of "fragments making a whole".

The piece is a vastly over-sized "charm bracelet", with each charm representing a life experience, a mental attitude or  just a view point on how we should live our lives. Each has a very particular meaning for me, but I'd prefer not to reveal those personal meanings - you may see/feel something entirely different when viewing the charms, based on your own personal life experiences.

Each charm is made of found objects, some man-made, some natural and lots of beads. They are simply, even roughly attached to a wrought iron ring - life is NOT pristine or perfect!

The show runs through October 30th, do visit if you're in the area.

Sunday, September 21, 2014

Sunday, September 7, 2014

Charms


I've been working on a new project; I'm not ready to share too many details just yet, but it involves creating "charms" representing significant life events or words to live by - I'll be sharing some "sneak peeks" with the final reveal coming at the end of the month!

Sunday, July 6, 2014

Too Late, Too Soon...


The Natural Resources Preservation Fund of the Mackinac Island Community Foundation is presenting a juried art exhibit July 3rd - July 29th. 

16 pieces, created by 12 artists were selected for the show.... and two of them are mine!


In my ongoing effort to use beads in non-traditional ways, I created two mixed media pieces. The first is titled "Beautifully Invasive: Hawksbeard". Right now this is a familiar scene on the Island, the darkness of cedar forests, blanketed in a carpet of bright yellow. I was surprised to learn that in Michigan, hawksbeard is only seen on Mackinac at such high concentrations.

I created the piece by using gel medium to create the tree trunks (lots of texture), painted the canvas and then beaded right through the canvas to emphasize the flowers.

The second piece, "Trillium" focuses more on the native flora and was started in a similar manner, using gel medium and paint, but the bead work was first completed and then added to the canvas.


The goal of the show is to be both visually pleasing and thought provoking - consider what may happen to any environment if invasive plants and/or animals overpower and destroy the native ecosystem. History shows many examples of what can happen and it is unfortunately becoming an increasing common problem in our modern world. 

Wednesday, July 2, 2014

Local Eats


I'm very excited!!!

We recently signed up with Local Eats, an interesting variation on the CSA(Community Supported Agriculture) concept. While there are traditional CSA's within driving distance, we just aren't able to commit to traveling off-Island to pick up our share every week, but Local Eats works with local farmers and will deliver our basket to one of the local ferries for us to pick up on arrival on the Island - although Ann Marie did say it felt rather like putting an infant on the boat unattended!

Last week we received our first basket:

A dozen eggs
Rhubarb
Fresh Oregano
Spinach
Arugula
Several types of Lettuce
Radishes
Green Onions
A Bouquet of Flowers

We've been eating very well, lots of salads, a spinach and white bean soup, a couple of frittatas, black pepper pasta with arugula, buttermilk rhubarb cake and a fabulous rhubarb and raisin relish.

Really looking forward to tomorrow's delivery!

Saturday, June 14, 2014

Touch-Stones


"Touch-Stones" is definitely a statement necklace and is my latest beaded piece. Even better, it's actually for me, not for sale.

Each of the three pendants is a stone collected on significant journeys in my life: Isle Royale, Montreal and Gloucester.

I used several beading techniques, including twisted tubular herringbone, right-angle weave and peyote stitch.


Thursday, June 5, 2014

GORGEOUS NOTHINGS: The Grave is the Ultimate Seal


I was recently invited to participate in a rather unique exhibit: The Gorgeous Nothings, based on the envelope poems of Emily Dickinson and held at Three Pines Studio in Cross Village, MI.

What's an "envelope poem"?

In the mid-1990s, while examining Dickinson material in the Amherst College Library, the literary historian Marta L. Werner came across a small, irregularly-shaped collage cut from recycled 19th-century envelopes and covered with writing in Dickinson’s unmistakably hieroglyphic script.

Enchanted, Ms. Werner started a search for similar items in other collections and found dozens, long familiar to Dickinson experts but never examined as a group. Most were less elaborate than the collage. Some consisted of semi-intact envelopes that had been gently pried apart at the seams and flattened out. Others were fragments: torn-off corners of envelopes, detached flaps.

Whatever their configurations, the pocket-size papers shared one feature: sentences, stanzas and entire roughed-out poems pencil-written by Dickinson herself.

Now all the known “envelope poems” — 52 — have been gathered into a book called “Emily Dickinson: The Gorgeous Nothings,” published by New Directions and the art dealer Christine Burgin. 

My chosen envelope poem was A842:
As there        are
Apartments        in our
own     Minds        that-
we      never      enter
without          Apology-
we    should       respect
the     seals    of    
others  -        

When I read the poems of Emily Dickinson, it's always through a 19th century filter - I've been involved in mid-19th century living history too long for it to be any other way.

My first inclination was to go in the direction of phrenology, especially the idea of apartments or compartments in the mind.

But I was really intrigued by the idea of envelopes and seals.

Clothing, of course, envelopes the body and I was relatively certain that no one else would use a period correct fan-front dress as the base of their work. Thus, "Emily dressed"!


There is symbolism in every aspect of this piece, some relating to the poem and some relating to Emily and her body of work.

I chose a fan-front dress, as that is the style Emily wears in the only authenticated image of her as an adult, albeit in an earlier style of fan-front. And it had to be in white, of course - it helped that I had a bolt of white lawn in my stash.


Adorning the front of the bodice is a winged death-head, an image from a very old Massachusetts grave stone, reference to death that so often is the focus of Emily's poetry.


Crossed bones, from the same stone, embellish the sleeve jockeys. You can also see the very fat piping I used, black wool yarn in the center. While I love the look it achieved, it was rather hard to force myself to use it - certainly not period correct!


Each flounce is centered with a large, ornate keyhole, a reference to seals. In addition, each flounce was hemmed using a feather stitch, an allusion to "Hope is a thing with feathers".


The top flounce also depicts a mid-19th century image of an apartment building, with people going about their daily routine.


The bottom flounce features a very appropriate quote, from Lydia Child's The Frugal Housewife, a book that Emily's mother was known to have owned:

“The true economy of housekeeping is simply the art of gathering up all the fragments, so that nothing be lost. I mean fragments of time as well as materials.”

The piece includes two final embellishments, a pair of chatelaines:


The first is a group of envelopes, translucent, allowing the contents to be glimpsed - an barium page, a bit of lace, some buttons, a tiny silhouette and ripped up printed pages. The envelopes are not addressed - who are the intended recipients?

The second is a trio of large over sized keys, keys allowing the opening of seals.


The other participating artists created equally thought provoking pieces, all on display until June 16th. Will you be in Northern Michigan? If so, do try to work in a visit to Three Pines Studio!

Friday, May 23, 2014

2014 Conference Fabric - Fabric for the Ladies


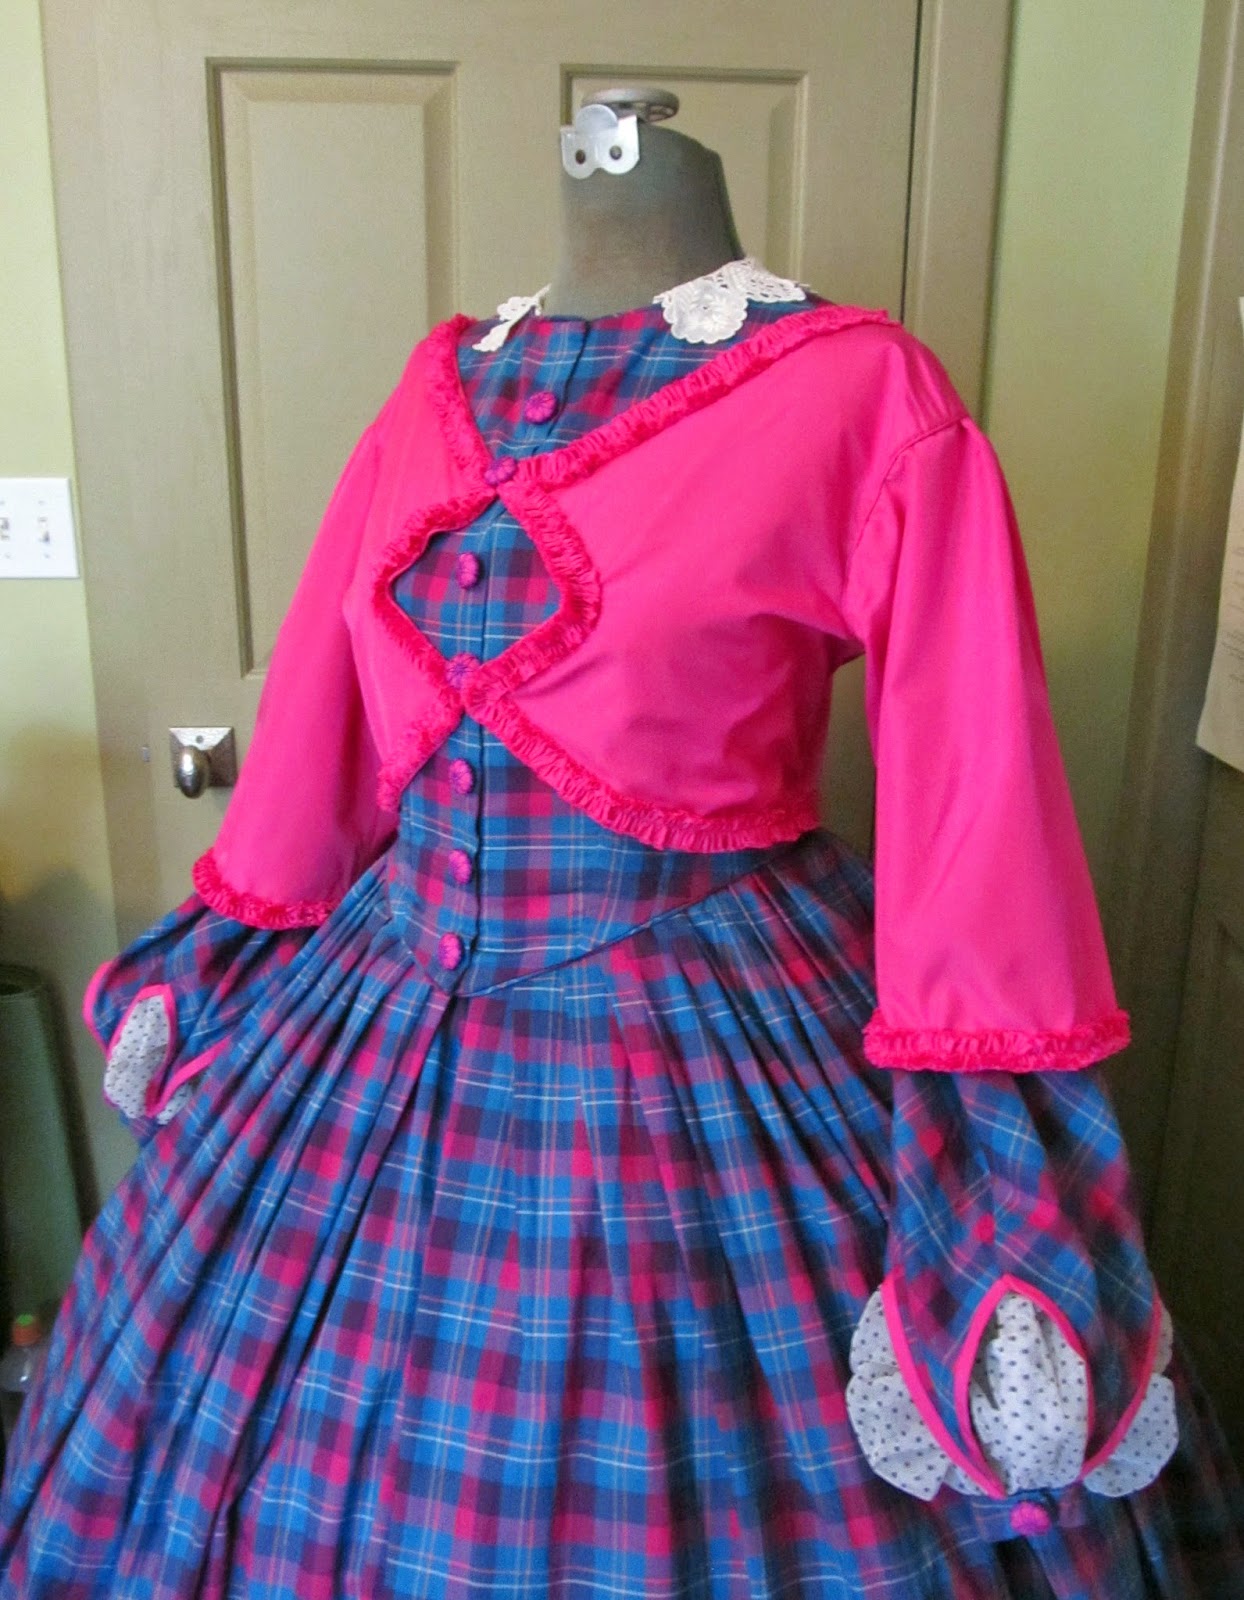
One of the annual highlights of the Ladies & Gentlemen of the 1860's conference is the Saturday morning reveal of the "conference fabric" - each faculty member receives a piece, a dress length for the ladies and a different fabric for the men, typically enough to make a vest. It's always amazing to see how different the same fabric can look made up, depending on the choice of trims, placement, etc.

I always have both a sense of excitement and apprehension when I open up the package- like it or not, it must be made into a garment and worn. I'll admit u front, this is not a fabric I would have chosen for myself, but it has grown on me a bit as time has passed.

The fabric is a fine Italian cotton, with a lovely hand. I felt the colors would have been more typically used on wool or silk in the period, which was confirmed by Carolann when she described the fabric during the "Reveal".

With a fabric this bright and bold, there's only two options: attempt to tone it down or embrace and enhance the color. Most participants went with the tone it down option.

But when I went through my fabric stash and found this perfectly matching length of silk poplin, my choice was made: Embrace it or as a friend described it, "you bear- hugged it into submission".


I used a fashion plate (the lady on the left) and a sleeve detail from an original garment as inspiration.


My approach with the fashion plate was not to create a duplicate, but instead to interpret the details into my garment; I believe this is more the way fashion plates were used at the time, as opposed to being literally copied.


I did not have fabric to create the double skirt, but did have enough to place trim with the same dagged shape - I did not have this done for conference but added it later.


The bodice has a slightly pointed front and is trimmed with fancy buttons. I'll be posting more about the buttons in a subsequent post.


The sleeves are bishop style, with a twist - ending in points and brought back together at the cuff. The require a full undersleeve to hang properly, in this case, made of black spotted netting. Yes,I combined plaid and polka dots.


It wasn't clear in the fashion plate if the jacket was a true jacket or trim applied to look like a jacket. I decided to go with a true jacket, to give a little more versatility.


So there it is, the "diamond dress" - I'll be wearing it at Greenfield Village this weekend, see you there!


Tuesday, May 13, 2014

Places of Mackinac Exhibit


I'm very pleased to have had  a piece accepted into the 2014  "Places of Mackinac" art exhibit at the Richard and Jane Manoogian Mackinac Art Museum... and a photograph no less, the first time I've had a photo on public exhibit.

My photo is entitled "Winter Blues" and depicts foot thick slabs of ice, piled on the shore of the Island. This ice is bright blue and glows against the gloomy grey sky, absorbing and reflecting every bit of ambient light.  

How is this a "place" of Mackinac?

Well, every island is ultimately defined by water and for the year round residents of Mackinac, winter's ice and it's impact on our lives,  is most certainly a "place"!

If you're visiting Mackinac Island this summer, do try and make time to visit our art museum - the permanent collection is fabulous and the seasonal, juried exhibit is always a pleasure too!

Sunday, April 20, 2014

Whirling Hollyhocks - A Textile Necklace


I remember making hollyhock "ballerinas" as a child and I decided that hollyhocks would be focals for this particular piece.
 
But how to do that exactly?


With mid-19th century fine dressmaking techniques, of course.

I started with the three dimensional center of the hollyhocks, using a technique more commonly used for creating fancy needle woven buttons (I plan a post regarding the buttons soon). I stuffed a circle of silk taffeta with wool roving and then used silk thread to add the needle woven embellishment. The addition of a silk taffeta rosette with self fabric fringe (two more Victorian techniques) formed a textile hollyhock. The teal version just has an oversized center and a minimal ruffle petal.

The base of the necklace is a corded ruffle, with the layers offset and, again, self fringed. The base also forms a loop, near center front, half of the closure, the other half being a slightly larger hollyhock center.


Available for purchase in my Etsy shop - Backward Glances.

Sunday, March 30, 2014

2014 Conference Fabric - The Gentlemen's Fabric


One of the annual highlights of the Ladies & Gentlemen of the 1860's conference is the Saturday morning reveal of the "conference fabric" - each faculty member receives a piece, a dress length for the ladies and a different fabric for the men, typically enough to make a vest. It's always amazing to see how different the same fabric can look made up, depending on the choice of trims, placement, etc.

This year, the men received the above fabric - I don't remember the exact textile makeup, wool and silk? Wool and linen? 

Regardless, it had a lovely hand and was enjoyable to work with. But the big question was how to use it? Robin has several vests now, in a variety of fabrics and a vest just doesn't have as many options as does a dress.

This pattern has been floating around in my brain for several years now:


It's from Peterson's, circa 1857. No instructions are given, just the diagram. Looking at the design, it seemed to be intended for braidwork - the pattern is continuous for the most part, with few stops or starts. But I have not yet encountered an original trimmed in such a manner - so time to do some research!

First I reviewed all my photos of originals: embroidery but no braidwork. Then I started on the reference books and in Nineteenth-Century Costume Treasures published by Shippensburg University, I found my first clue - the same pattern as above, with the note that it had been previously published in the Ladies' Cabinet of Fashion (an English publication) in 1852.  

A bit of online searching, and success!


This time instructions were included:

GENTLEMAN'S WAISTCOAT, IN APPLICATION.


Materials :—Black Cloth sufficient for a Waistcoat; black Velvet, Albert Braid, and Gold Thread.


The design given is equally adapted for braiding and application. The latter term is applied (as most ladies are aware) to any sort of work in which the pattern is formed in one fabric, and laid on another, which is the ground. The edges are finished in various ways. When muslin and net are used, the edges are sewed or button-holed over; for velvet, cloth, and satin a braid of some sort is usually laid over the edge, and sewed over. The Albert braid, recently made in this country, is especially adapted for such a purpose; it looks much richer than the flat silk braidings; and when edged on each side with gold thread, it has a very rich effect.


To prepare the work, draw the pattern the full size, on bank-post paper, and mark all the outlines by pricking them, at equal distances, with a coarse needle. Place the pattern over the velvet, keeping it in its place by means of weights, and apply fine pounce all over the surface with a large flat stump. When the paper is removed, the design will be seen clearly marked on the velvet. By laying the paper on the other side, the other half of the waistcoat can be marked. As these outlines are, however, easily effaced, it will be necessary to mark them over again with a solution of flake-white and gum-water, applied with a fine sable brush.


As in all else, there is a great improvement in the mode of marking patterns of late years. These prepared patterns, with a powder which u very adhesive, and a large stump, made for the purpose, can be readily obtained. The composition of the powder is a secret; but where 'he work is to be either cut out (as in applique) or braided immediately afterwards, this powder is sufficiently adhesive to enable the worker to dispense with the second marking.


The velvet should be cut out very accurately, and with sharp fine scissors. Then fine size, made of the best glue, being slightly applied to the hack, the velvet is laid on the cloth, in its proper place. When dry, the edges are to be finished first with Albert braid, then with a gold thread laid on at each side of it.

The scrolls are worked with the braid and thread only, and the veining of the leaves are done in the same way. The ends are to be drawn through the cloth, and fastened in the back.

If the waistcoat is to be braided only, without the application, a colour different from that of the material itself may be chosen for the braid. Narrow flat silk braid, commonly known as Russian or French braid, may also be substituted for the Albert; and the gold thread may be dispensed with. The design I have given is the newest style; and the shape of the enlarges pattern very good.

As I happened to have a large spool of pale blue soutache or "Russian" braid, my decision for this particular vest was made!

I typically use the Martha McCain Simplicity vest pattern - it fits Robin well and is accurate. But a couple problems quickly became obvious - the braiding pattern did not leave space for the pockets and did not fit on the lapels.

So back to the photos of originals, and as I suspected, original embellished vests always left room for the pocket welts. So I chose to split and separate the motifs. I considered designing some type of "bridge" embroidery to connect them again, but after completing the two separate motifs, I decided it would be too busy.

As for the lapels, turning the motif upside down fixed that problem. Changing fashion, over the decade between 1852 and the mid-1860's  probably accounts for the change in lapel shape.


I put in the darts and the pockets (I loath doing welt pockets!) before starting the embroidery and stitched through the paper pattern, pulling it away later. I found a beading needle worked very well, as it's important to stay in the center ditch of the soutache braid.


I had a set of buttons in my stash that I had intended to use, but didn't like them once the embroidery was finished. So I made a set of perfectly matched to the fabric grindle buttons, tutorial available here.

And here's the final result:


The above two photos were taken during the "grand reveal". Unfortunately, we failed to take any "posed" shots - must remember to do so this summer.

I'm quite pleased with the results, although I so see all the flaws, and Robin has been sternly cautioned to avoid any spillage - those results would not be pleasant!


Sunday, March 23, 2014

Moving With the Times - Battledore and Shuttlecock, Part 2

As promised, here's our experiences in creating a pair of battledores and shuttlecocks, following the instructions provided in The Boy's Own Toy-maker, published in 1854. I provided the full text in my previous post, available here.

The first step was to create the hooped top. 

The instructions called for lance-wood, a tough, heavy, elastic, straight-grained wood obtained from several different trees of the custard-apple family (Annonaceae). True lancewood, Oxandra lanceolata, of the West Indies and Guianas, furnishes most of the lancewood of commerce in the form of boat spars. Lancewood was formerly used by carriage builders for shafts. The smaller wood is used for whip handles, for the tops of fishing rods  and for various minor purposes where ever an even grained, elastic wood was desired.

We used pine, in the provided dimensions, and started by marking off the "nicks" to be cut, which allow the curve.


We discovered that it is necessary to leave an un-nicked section in the center, to prevent breakage.


First we soaked the pine strip in the tub, for about a half hour, to start the softening process:


Which then allowed us to bend it enough to fit in my largest stock pot. We allowed it to boil for 8-10 minutes.


Prior to starting, we had cut a form in our desired shape and size, again from pine. Working quickly, we removed the strip from the boiling water, lightly nailed to the form in the center and gently bent it to shape, clamping it in place.


This is what it looked like after it had dried overnight:


Next the handle was glued in place - no picture, sorry!

Then it was time to cover the hooped area in parchment - true parchment, not parchment paper.The term parchment refers to any animal skin, particularly goat, sheep, or cow, that has been scraped or dried under tension. Sourcing the parchment was the most difficult part of this whole project; I found it on eBay for $10 for a 7" x 10" sheet - the pair of battledores required for sheets.

Covering the hoops is much like covering the lid of a bandbox:


Except the the parchment should be dampened first.


I used a modern, artist product - Golden's Gel Medium to glue the parchment, but hide-glue would have been a more period adhesive.


I did one side at a time, allowing them to dry in between applying each side. Once dry, the parchment shrinks, providing a drum like tension. I then finished the edges with blue velvet ribbon and bound the handle top with black cord.


On to the shuttlecocks - a champagne cork is an excellent starting point, requiring only a bit of reshaping.

We did not have any grey goose feathers - we found a source, but they had a minimum purchase of one pound of feathers! Far more than we needed, so we substituted packaged feathers available from most craft stores. Try to pick feathers as close in size to each other as possibly for better aerodynamics.


The last step is to weight the shuttle-cock - we used a common tack, the instructions call for a short brass-headed nail. This step is very important, the shuttlecock will not fly properly without it.


One thing the period reference does not mention, is the sound produced by the shuttlecock hitting the battledore - the 2117 hits mentioned in the previous post would have driven me crazy!

Overall, these are really not at all difficult to create - the provided directions actually work, unlike some of the projects in Godey's and I anticipate them being a great deal of fun at events this summer, as well as a really good way to interact with the public.