Wednesday, December 15, 2010

Bead Journal Project - May


The fantasy dressmaker decided to focus on tatting this month.

Tatting is a handmade knotted lace formed with thread and a small shuttle. The shuttle works as a thread-holder and, as with a weaving shuttle, it moves between the threads on the loom of the hand - but that is the only similarity with weaving.


Only one simple knot is used throughout, the Lark's Head, consisting of 2 half-hitches over a core thread. Although it is a knot, in tatting language it is called a double stitch and consists of a first half and a second half stitch.

Gaps are usually left amongst the stitches to form picots, which can be employed for practical construction in addition to decorative effect.

In my bead tatting, each white bead represents a double stitch and each green bead represents a picot.


Lace was in great demand in the 19th century, but lace was extremely expensive, out of the reach of most people. This encouraged creativity, which was helped by the newly available tougher mercerized threads produced from about 1840. Inventive needleworkers found ways of making lace that were relatively inexpensive and also much quicker to produce than the traditional forms, including tatting.

The first tatting consisted of rings only - usually worked in a length of slightly spaced rings. The rings would be arranged and laboriously stitched together in motifs by connecting the picots.

During the 1860's, chains started to be used, allowing for more complicated designs.


In the 19th century and well into the 20th century, tatting was used like crochet or knitted lace mainly for edgings, collars, doilies, etc.

Prior to the early 19th century, tatting was white or ecru, later examples may include multiple colors.

Tatting is both delicate in look and sturdy in construction. It often survives longer than the cloth which it embellishes.

Tuesday, December 14, 2010

You Know It's Cold When...Part 2


The Huron is the only ferry operating at this time of year; the steel hull can deal with breaking through a fair bit of ice. That was a very good thing this morning; after being moored in the harbor in St. Ignace overnight, it took nearly an hour to break free for the first trip of the day to the Island.

Yes, that's a fully decorated Christmas tree, complete with lights - here's a very early morning photo taken last year:


Our currently frigid weather leads to some interesting phenomena, for instance, horizontal icicles!

It's caused by the spray of water hitting the bow and freezing instantly in the wind


I know you must be thinking, "what's with all the concern with ice all of a sudden?"

Well, ice is a major topic of conversation on Mackinac this time of year: When will the ferry be forced to stop due to ice? (soon, very soon most likely), Will there be an ice bridge?

When you live on an island in northern Michigan, everything is focused on water and it's transformation to ice.

So we wait and watch...

Monday, December 13, 2010

You Know It's Cold When...

Most of the year, I bicycle to work.

But late each year the roads become too icy and it's time to walk. It's not a bad walk, about a mile and half, through a cedar forest...and it's all downhill...going to work.

Coming home is another story...

Here's my view as I break through the woods at the edge of the bluff:
That's not fog or snow swirling around lighthouse - it's steam.

The water is around 40 degrees, but the air this morning was around 5 below zero and that temperature differential causes the water to steam.

The old timers say the lake has to steam seven times before the ice makes; based on this weeks forecast, the ice will be making very soon!


Sunday, December 5, 2010

Variations on a Theme


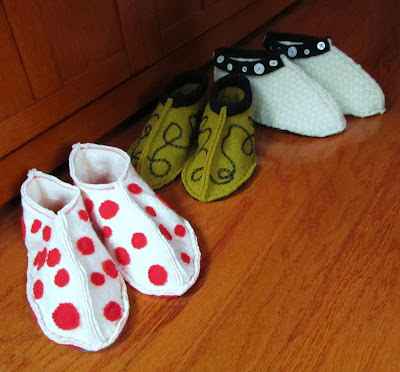
I liked my "warm toes" so well, that I made some more - this time as a donation to a fundraising event and all a variation on the basic theme.

This pair is covered with a swirling asymmetrical chain stitched design and the cuffs bound off with a bit of knit trim, there was jussst enough - it must have been meant to be!


This pair ended up with a fold over cuff and studded with a variety of vintage mother of pearl buttons. When I cut these out, I preferred the inside of the felted wool sweater, it had an interesting honeycomb look - so my advice is "look inside before you decide".


These are fun, appliqued dots, in random sizes and placement.


This particular sweater was light weight, so I lined the slippers in the same wool - making them warmer and hiding the applique stitching. I used a fancy stitch on the sewing machine to join the outers to the lining. I had considered a red cuff, but it looked to "elf" like for my taste.


The results: a nice donation of useful and fun items... and no purchase of supplies needed, it all came from the STASH!

Wednesday, December 1, 2010

Bead Journal Project - April


The fantasy dress maker was inspired by borderie anglaise this month.

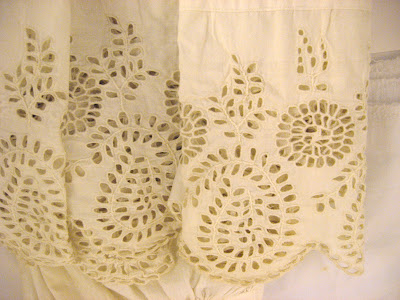
Borderie anglaise is characterized by open spaces or eyelets in a variety of sizes and spaces, the edges of the eyelets are oversewn with buttonhole stitch. Designs are fairly simple, floral motifs, scrolls and palms or paisleys.

Here are a couple mid 1860's examples, first a petticoat:


And a pair of undersleeves:


It's origins are uncertain. According to Weldon, Broderie Anglaise originated from Czecho-Slovakian peasant embroidery and was brought to England in the 9 th century. Mary Thomas says it is also known as Ayrshire, English, Eyelet, Madeira or Swiss work, also notes the work from Czechoslovakia , though does not offer Broderie Anglaise origins. Pamela Clappburn states it is “a type of cutwork embroidery which evolved in Britain about 1850 from the earlier Ayrshire embroidery”. Certainly it became very popular at this time.

Fabrics used had a firm fine texture – cambric, muslin, cotton, lawn, fine linen, good crepe de chine.

The work consists of open worked spaces, varying in size and shape. The design is traced onto closely woven fabric. Running stitch is first worked around the traced outline of round or oval holes ( eyelets), then the shape is pierced (with a stiletto, a sharp-pointed tool) or cut from the centre. Each hole is made as work progresses. T he edges are then stitched with overcast stitch or buttonhole stitch.

In time, the holes became bigger, which meant they had to be cut out. This was done by snipping with sharp pointed scissors, from side to side and top to bottom of the shape without cutting the outline thread. The fabric flaps were turned under, then the hole over-sewn. Eyelets with less than ¼ inch diameter used a stiletto, larger than ¼ inch, are cut.

I chose a pattern from the February 1857 edition of Peterson's Magazine:


Here's my results:


The directions state: "It is cut out ans sewn over with rather coarse embroidery cotton; the best and most durable material being a fine long cloth."


I had some lovely linen in my stash for the base. I cut each eyelet as I was ready to stitch, using size 11/0 seed beads as my substitute for "coarse embroidery cotton".


I like it and am visualizing other projects where I could use the technique - maybe a bridal bag or even an Edwardian bolero style jacket.

Friday, November 26, 2010

Maybe I Pushed It TOO Far...

I enjoy learning and/or creating new beading techniques, and I really love to push the techniques in directions that no one expects - my bead embroidered silk transfer images are a good example, what started as just a bit of simple surface embellishment has become increasingly complex. I keep experimenting with a variety of techniques to better capture the textures and dimensions of the different subjects.

But I think I may have went to far...


Here's the photo I started with:

My thought was to create custom "portrait bags", a long lasting remembrance for ladies attending the annual "Somewhere in Time" weekend each October. Many of these ladies have invested large amounts of time and money assembling their ensembles, for a once in a lifetime experience.

What do you think - good idea or a bit too much?


Monday, November 22, 2010

Branching Out


This is my first submission to the Art Bead Scene's monthly challenge; this months inspiration piece is Gustav Klimt's "Tree of Life".


I have always been enamored of Klimt's work, the dense patterns and and shimmering colors are definitely full of inspiration.


The blue tree art bead is from my stash, I don't recall where it came from, but it was a great starting point for this piece.


I wanted it to hang on the bead-studded herringbone chain, not below it. Sunburst peyote rings connect the herringbone to brass chain.


The clasp is formed of another sunburst ring and a beaded toggle.


I've been experimenting with mixed technique pieces, but this is quite different from most of my work - not so much the colors, but the overall "feel" of the piece is lighter, looser? I'm not sure how to describe it, but I do like it!